SA-Announce on Windows Server as a Virtual Appliance
This article provides instructions on how to set up and use Syn-Apps’ SA-Announce notification software as a Virtual Appliance (VA) running a VMWare OVA (Open Virtualization Archive) or Microsoft Hyper-V VHD.
There are four basic steps:
- Download and verify the SA-Announce VA file. Request an evaluation license if you don't already have one from Syn-Apps Support.
- Deploy SA-Announce VA to a virtual machine.
Note: We recommend the following when joining the Windows server to a domain or installing secondary software such as antivirus software:- Wait to join the Windows Server or instal secondary software until after SA-Announce has been configured and tested.
- Back up the OS before joining the server or installing secondary software.
- Configure SA-Announce.
- Replace evaluation licenses with production licenses, if you decide to purchase the product.
Download, Verify, and Deploy SA-Announce VA File
SA-Announce VA can be downloaded as a VMWare or a Microsoft Hyper-V VHD file. Both files contain a 180-day Windows Server evaluation license and the SA-Announce product. Choose the virtual appliance best suited to your particular environment.
- Follow the VMWare OVA instructions to deploy SA-Announce VA to a
- virtual Windows 2016 environment on a host Windows Server 2012 R2 or 2016, … using
- VMWare ESXi 5 (or newer) … or
- VMWare Workstation 8 (or newer)
- Follow the Hyper-V VHD instructions to deploy SA-Announce VA to a
- virtual Windows 2016 environment on a host Windows Server 2012, 2012 R2, or 2016 … or
Note: Per Microsoft documentation, server 2008 R2 does not support running a 2016 virtual server. - virtual Windows 2012 R2 environment on a host Windows Server 2008 R2, 2012 R2, or 2016
- virtual Windows 2016 environment on a host Windows Server 2012, 2012 R2, or 2016 … or
VMWare OVA
Important: We recommend customers download and run the CheckSum program prior to installing the OVA to verify the SA-Announce OVA file you’ve downloaded is not corrupt or incomplete.
- Download the Checksum.zip file and unzip to c:\. (http://downloads.syn-apps.com/Downloads/SA-Announce_Virtual_Appliance/MS_File_Checksum.zip)
- Download the VMWare OVA to c:\. (If link doesn't work, go to SA-Announce website > Products > SA-Announce > SA-Announce Virtual Appliance.)
- After the OVA finishes downloading, run C:\MS File Checksum\OVA Checksum.bat.
- Compare the checksum output to the checksum listed in C:\MS File Checksum\Checksum Value for Intact OVA.txt to verify they are the same.
Request SA-Announce Evaluation License
If you have not already received an evaluation license from Syn-Apps Support, navigate to our SA-Announce OVA webpage to obtain your free 30-day SA-Announce evaluation license file from Syn-Apps Sales.
Deploy the OVA
Decide how you want to deploy the OVA:
- Option 1: VMWare ESXi 5 or newer
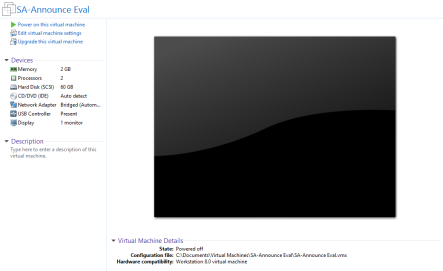
- Option 2: VMWare Workstation 8 or newer, preconfigured with:
- Memory: 2GB
- 2 Processors
- Hard Disk 60G
OR
Option 1: Deploy OVA to VMWare ESXi 5 or newer
Note: Use the Chrome or Firefox browser with the vSphere Web Client. Internet Explorer has a 4 GB file size upload limit, therefore deploying the OVA file will fail with IE.
- Launch and connect to the VMware vSphere Client.
- Click File > Deploy OVF Template.
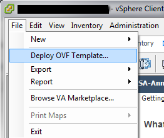
- Browse to the downloaded .ova file and click Next.
- Click through the deployment steps and select your desired configuration options. Refer to the SA-Announce User Guide for your PBX system for deployment and configuration information.
Option 2: Deploy OVA to Workstation 8 or above
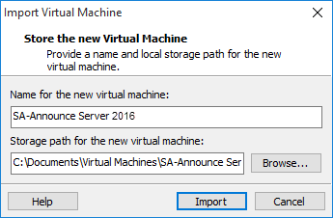
- Open the OVA in the VMWare Workstation.
- Enter a name and local storage path for the VM and click Import.
Log Into the VM
- Power on the VM.
- First time setup prompts you to create a password. Click Next and run through the steps to create a password.
Hyper-V VHD
Important: We recommend customers download and run the CheckSum program prior to installing the OVA to verify the SA-Announce VHD file you’ve downloaded is not corrupt or incomplete.
- Download the Checksum.zip file and unzip to c:\. (http://downloads.syn-apps.com/Downloads/SA-Announce_Virtual_Appliance/MS_File_Checksum.zip)
- Download the appropriate Hyper-V VHD file for your host server:
- Microsoft Hyper-V 2016 VHD to c:\. Use this download if your host server is Windows 2012, 2012 R2, or 2016.
- Microsoft Hyper-V 2012 VHD to c:\. Use this download if your host server is Windows 2008 R2, 2012, 2012 R2, or 2016.
(SA-Announce website > Products > SA-Announce > SA-Announce Virtual Appliance)
- After the VHD finishes downloading, run C:\MS File Checksum\OVA Checksum.bat.
- Compare the checksum output to the checksum listed in C:\MS File Checksum\Checksum Value for Intact OVA.txt to verify they are the same.
Request SA-Announce Evaluation License
If you have not already received an evaluation license from Syn-Apps Support, navigate to our SA-Announce OVA webpage to obtain your free 30-day SA-Announce evaluation license file from Syn-Apps Sales.
Create a Hyper-V VM
- Click Start > Administrative Tools > Hyper-V Manager.
- Click Action > New > Virtual Machine.
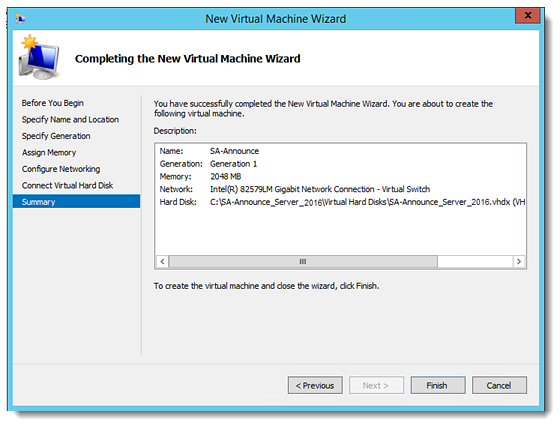
- Enter SA-Announce in the Name field on the Specify Name and Location screen, and click Next.
- Select Generation 1 on the Specify Generation screen, and click Next.
- Enter 2048 as the Startup memory on the Assign Memory screen, and click Next.
- Select Intel(R) 82579LM Gigabit Network Connection – Virtual Switch for the desired NIC on the Configure Network screen, and click Next.
- Select Use an existing virtual hard disk on the Connect Virtual Hard Disk screen.
- Browse to the appropriate vhdx file in the folder where you downloaded the SA-Announce VHD file, and click Next.
Note: You may have moved the VHD file to wherever you created the VM. - C:\SA-Announce_Server_2016\Virtual Hard Disks\SA-Announce_Server_2016.vhdx
- C:\SA-Announce_Server_2016\Virtual Hard Disks SA-Announce_Server_2012.vhdx
- Click Finish on the Summary screen.
Log Into the VM
- Power on the VM.
- First time setup prompts you to create a password. Click Next and run through the steps to create a password.
Configure SA-Announce
- Place the SA-Annunce evaluation license file in
c:\Program Files (x86)\Syn-Apps\SA-Announce. - Click Start > Programs > Syn-Apps > SA-Announce > Configuration to go through the SA-Announce configuration steps. Refer to the SA-Announce User Guide for your PBX system for information on how to configure SA-Announce.
You are now ready to use SA-Announce in a virtualized environment. Contact Syn-Apps Support for any additional questions.
Upgrade to Production Licenses
After the evaluation period, you need to switch to production licenses for both MS Windows Server 2016 (or 2012 R2 if your host server is 2008 R2) and SA-Announce.
Windows Server 2016 and 2012 R2
You must contact Microsoft Support to obtain a Product Key to update the 180-day evaluation license to a production license. Once you’ve obtained the Product Key:
- Open the Administrator CMD window.
- Enter DISM /online /Get-TargetEditions.
- Note the following return info:
- Target Edition : ServerStandard
- Target Edition : ServerDatacenter
- Do one of the following:
- If you have a Standard product key, enter
DISM /online /Set-Edition:ServerStandard /Productkey:XXXXX-XXXXX-XXXXX-XXXXX-XXXXX /AcceptEulawhere XXXX is the product key you obtained from Microsoft.
Note: A Standard product key works best for SA-Announce. - If you have a Datacenter product key, enter
DISM /online /Set-Edition:ServerDatacenter /Productkey:XXXXX-XXXXX-XXXXX-XXXXX-XXXXX /AcceptEulawhere XXXX is the product key you obtained from Microsoft. - Reboot the computer as directed by the screen instructions.
SA-Announce
- Contact Syn-Apps support@syn-apps.com or sales@syn-apps.com to obtain a production SA-Announce license.
- Copy the license to
c:\Program Files (x86)\Syn-Apps\SA-Announceand overwrite the existing license. - Click Start > Programs > Syn-Apps > SA-Announce > License Utility to activate the new license.