Backup / Move / Restore SA-Announce v9.0.18 and newer
Important: The following procedures use the Backup and Restore Utility included with SA-Announce versions 9.0.18 or newer. If you are using SA-Announce versions 9.0.17 or older, follow the Backup / Move / Restore SA-Announce v9.0.17 and older instructions.
Which task do you need to perform?
- Just need to back up your SA-Announce database? Follow the steps in the Backup Database section and ignore everything else.
- Need to move SA-Announce to a new server? Follow the steps in the Backup Database and Move Database sections.
- Need to restore the SA-Announce database, on the same server, because it became corrupted or you had hardware failure? Follow the steps in the Restore Database section. (These scenarios are rare.)
- Need to roll back to a previous version of SA-Announce after an upgrade? Call Syn-Apps Support for assistance, 1-866-664-6071 option 2. (This scenario is infrequent.)
Backup Database
Make sure you backup SA-Announce while it’s in a working state.
- Log in to the SA-Announce source server.
- From the Start menu, click SA-Announce > SA-Announce Backup and Restore.
- Click through the Wizard prompts.
- Location of Backup File: You have to click Browse to select the folder and provide a name for the resulting ZIP file. You cannot type in a location.
- Summary screen: This is a read-only screen that simply provides info on what’s being backed up.
- Should an error occur, the backup stops and presents an error message that you must acknowledge before the backup can attempt to proceed.
- Any custom WAV files are backed up.
- Registry settings are backed up, including Virtual Dialer Settings.
Command Line
You can run a backup from a command line or include it in a script that runs automatically.
- Go to c:/Program Files (x86)/Syn-Apps/SA-Announce/BackupRestore.
- Open a command line window.
- Drag BackupRestoreCLI.exe to the command window.
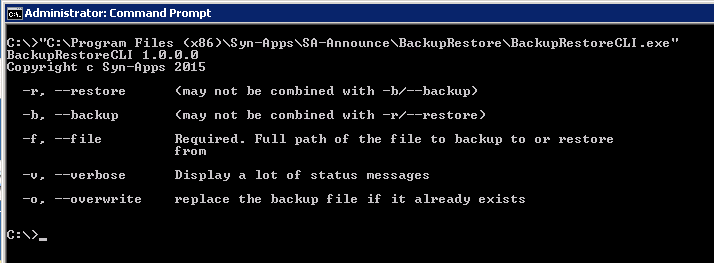
Here’s what you need to know:
- .zip is automatically added to the filename if you don’t include it.
- -v still writes to the log file.
- The utility checks for a valid filename and path.
- -o creates a copy of the existing filename and appends it with an incremental number. So you still have older versions of your backup.
- If an error is encountered during the backup process, the error message is written to the log and the backup process quits. We recommend checking the log file after scheduled backups for error messages.
Move Database
These are the basic steps:
- Move the files you backed up on the old server to the new server.
- Install SA-Announce on the new server.
Important: This requires a new license key. Contact Syn-Apps Support to obtain one – 1-866-664-6071 option 2. - Restore the SA-Announce database and custom files on the new server.
- Configure the newly installed SA-Announce.
- Update your DHCP server option 72 and your call manager with the new SA-Announce server IP address.
Move the Backup and New License Files
The database and your custom files were combined in a zip file with a filename of your choosing.
Move this file to the new server.
Install SA-Announce on New Server
Before You Begin: Did you obtain a new SA-Announce license key from Syn-Apps Support? If not, call 1-866-664-6071 option 2 or email support@syn-apps.com.
- Download the Universal Installer (Syn-Apps website > Resources > Product Downloads > SA-Announce tab).
Note: This installs the latest version of SA-Announce. - Install on new SA-Announce server. Follow the installation instructions provided in the SA-Announce User Guide for your PBX system (Syn-Apps website > Resources > Documentation > SA-Announce tab).
The SQL Database Engine installs automatically.
Restore Database
Note: You can run the Restore Utility from the command line, if you prefer. See Restore Database > Command Line below for instructions.
- Log in to the new SA-Announce server.
- From the Start menu, click Syn-Apps > SA-Announce >SA-Announce Backup and Restore.
Important: If you are restoring to a Windows 2012 server, you must run Backup and Restore as an administrator. - Choose Restore and click through the Wizard prompts.
- The restore process automatically shuts down SA-Announce services and the restarts them when the restore is finished.
- Any custom WAV files and virtual dialer settings are restored.
- The SA-Announce Configuration Utility automatically launches.
Configure SA-Announce
Note: For help with configuration and post-installation, refer to the appropriate SA-Announce User Guide available on the Syn-Apps website > Resources > Documentation page.
- Move the new license key to C:\Program Files\Syn-Apps\SA-Announce.
- Input information on screens until configuration completes.
- Double-click the SA-Announce shortcut on the desktop and follow the post-installation instructions.
Stop Services on Old SA-Announce Server
- Log in to old SA-Announce server.
- Launch Windows Services.
(Click Windows Start, type services.msc in the search field, and press Enter.) - Stop the SA-Announce Broadcaster and Scheduler Service.
- Set the Startup Type on both services to Disabled.
(Double-click each service name, select Disabled from the Startup Type drop-down list, and click OK.)
Restart Services on New SA-Announce Server
- Log in to new SA-Announce server.
- Launch Windows Services.
(Click Windows Start, type services.msc in the search field, and press Enter.) - Restart SA-Announce Broadcaster and Scheduler Service.
Restore Database
You can restore a broken SA-Announce in these circumstances, provided the last backup occurred when SA-Announce was in a working state.
- The database can have missing tables and data. However, the database cannot be entirely missing, except in the scenario when you are moving SA-Announce to a new server.
- Restore can handle missing registry keys.
- Restore can handle missing Cloud Service modules.
- Restore must be performed on the SA-Announce source server.
- We suggest checking the Scheduler before running Restore to make sure you’re not interfering with any scheduled notifications because Restore requires shutting down SA-Announce services.
- Log in to the new SA-Announce server.
- From the Start menu, click Syn-Apps > SA-Announce >SA-Announce Backup and Restore.
Important: If you are restoring to a Windows 2012 server, you must run Backup and Restore as an administrator. - Choose Restore and click through the Wizard prompts.
- The restore process automatically shuts down SA-Announce services and the restarts them when the restore is finished.
- Any custom WAV files and virtual dialer settings are restored.
- When the Restore Utility completes and launches the SA-Announce Configuration Utility, you don’t need to make any changes to current settings, but you do need to go through the prompts. Do NOT skip this step.
Command Line
You can run the restore utility from a command line. You cannot include it in a script because running it from the command line does not automatically run the SA-Announce Config Utility after the restore is complete. And you cannot skip this step.
- Go to c:/Program Files (x86)/Syn-Apps/SA-Announce.
- Open a command line window.
- Drag BackupRestoreCLI.exe to the command window.
- When the restore process is finished, go to the Start menu, click Syn-Apps > SA-Announce >SA-Announce Configuration.
Click through the configuration prompts. You don’t need to make any changes. Do NOT skip this step. - When the Configuration wizard completes it automatically opens the SA-Announce Interface to the Help >> Post Install Instructions page. Go ahead and move off this page. You don’t need to perform any post install tasks.
- Click Groups >> Create / Edit, log in, and run a couple of test notifications to check that things are working as expected.
Here’s what you need to know:
- You must include .zip with the filename.
- The restore process automatically shuts down SA-Announce services and the restarts them when the restore is finished.
- You must manually run the SA-Announce Configuration utility.
Update DHCP and Call Manager
- Update your DHCP server option 72 with the new SA-Announce server IP address and reboot all your IP devices so they can re-register with SA-Announce.
- Update your call manager with the new SA-Announce server IP address.
- CUCM – Update the Authentication URL.
- ShoreTel – Update Trunk, Authorized Server, and SIP Server Host.
- Avaya – Update 46xxsettings.txt and/or 96xxsettings.txt configuration files.
Refer to the SA-Announce User Guide for your PBX system if you need assistance updating these settings (Syn-Apps website > Resources > Documentation).
Troubleshooting
If for some reason the services did not automatically restart, manually restart them using the standard Windows Services utility.
- W3SVC
- SA-Announce Scheduler
- SA-Announce Broadcaster
- SynAppsCommandService
- SynAppsHeartbeatService
If the SA-Announce restore utility cannot successfully stop the services, it may be because the server is bogged down, for whatever reason, and the stop service request from the restore utility timed out before the Windows Services utility finished updating.
- Check the Windows Services utility to see if the services are still running.
- If they are, manually stop them, then start the SA-Announce restore utility again.
Log File
Once log.txt reaches 10MG, it is renamed to append an incremental number (for example, log1.txt) and the Backup and Restore Utility starts a new log.txt.